And You Thought Your 11x14 Was Large {Barbara LeGere Photography | Austin, TX}
That 11x14 you have framed in your family room - you thought, "wow, that doesn't really make the statement I thought it would." It doesn't. But, check this out...3 Panels - each 3 feet x 3 feet. That 3 feet by 9 feet of canvas - or 27 SQUARE FEET of gorgeous children! Don't let your images sit dusty and unused on that disc...put them to good use. Canvas is my favorite way to display your images. It comes ready to hang, with or without the frame. You can even order your canvas though me if you need the help.
OK, so the iphone doesn't do them justice. The child is for size reference. Thank you for sharing! They turned out beautiful!!
And, not only that, this is three of FIVE of the images she put on canvas and they all look great!
Now go put your pictures to work!
Showing posts with label photo tip. Show all posts
3.01.2011
Organizing your photos {Barbara LeGere | Austin Photographer}
"One day!!" One day I will organize these photos. One day I will back up these photos. One day I will print these photos. Start TODAY!
Don't look back, just start a system today. Implement it for everything in the future. Don't worry about where you've been. A year from now you will be sooo glad you did.
Here's my system. It's not perfect. It's redundant. And, it may not be for you, but perhaps it will inspire you to develop your own system.
1) UPLOAD by DATE to ONE spot
When I upload my photos, they ALL go to C->Pictures. If there's an image on my harddrive, it's there. Within that folder, I set my Canon software to upload all the pictures into folders by date. Now, I don't have to think about it, I don't do anything but plug in the camera. And, viola! They are just there in nice sequential order. (I once had a Nikon point&shoot camera and couldn't figure out how to do this, but I'm sure there's a way.) After that, I might add a description to the label, but never touch the date.
I.E. "2011_10_10" becomes "2011_10_10 Genny turns 1", just so I know where the important events are.
2) COPY into MONTH folders
Now comes the slightly more wasteful step, but it works for me. I HATE deleting photos. Always have, always will. So, instead, I create a folder for each year and a folder for each month within that. So, I'll go through a day of photos and COPY just my very favorites and place them into the month folder.
The photos in my 'month folders' are my favorites - the ones I will share with my family on Shutterfly (cringe) and ultimately make my photobooks from.
3) MOVE the 'day folders' into 'RAW YEAR' folder
Once I have finished building entire month's worth of favorite images, I move all the 'day folder' photos into a folder called 'RAW 2010' (or whatever the year is). So, now I don't have to look at the 'day folders' anymore. I just have a nice neat tidy month's worth of favorite photos. I rarely need to go back into the 'raw photos'.
4) UPLOAD to SHARE site
I upload the month's photos to my share page on Shutterfly and then I'm done.
Side note: I started a share page on Shutterfly when my first daughter was born. Now, I'm stuck with it because ALL our monthly images are there (five year's worth). I love going back and looking at them. While Shutterfly's quality is OK, I prefer my own professional printer. But, Shutterfly is now my 3rd back-up for personal images, so I can't complain - they are storing my images for FREE! If you'd like to see my share page, please send me an email and I'll send you a link.
5) CREATE a YEAR Photobook
At year's end, it is so simple to create a photobook of the year. I have all my favorites from the year by month. I can create it using any photobook site like shutterfly or my publisher etc. (This year I get to try out my new professional software...whoop!)
It sounds way more complicated than it is.
I can't stress enough to start a system today and stick with it.
and because this is a photography blog...here's one from yesterday: my littlest one's just-up-from-nap look
"One day!!" One day I will organize these photos. One day I will back up these photos. One day I will print these photos. Start TODAY!
Don't look back, just start a system today. Implement it for everything in the future. Don't worry about where you've been. A year from now you will be sooo glad you did.
Here's my system. It's not perfect. It's redundant. And, it may not be for you, but perhaps it will inspire you to develop your own system.
1) UPLOAD by DATE to ONE spot
When I upload my photos, they ALL go to C->Pictures. If there's an image on my harddrive, it's there. Within that folder, I set my Canon software to upload all the pictures into folders by date. Now, I don't have to think about it, I don't do anything but plug in the camera. And, viola! They are just there in nice sequential order. (I once had a Nikon point&shoot camera and couldn't figure out how to do this, but I'm sure there's a way.) After that, I might add a description to the label, but never touch the date.
I.E. "2011_10_10" becomes "2011_10_10 Genny turns 1", just so I know where the important events are.
2) COPY into MONTH folders
Now comes the slightly more wasteful step, but it works for me. I HATE deleting photos. Always have, always will. So, instead, I create a folder for each year and a folder for each month within that. So, I'll go through a day of photos and COPY just my very favorites and place them into the month folder.
The photos in my 'month folders' are my favorites - the ones I will share with my family on Shutterfly (cringe) and ultimately make my photobooks from.
3) MOVE the 'day folders' into 'RAW YEAR' folder
Once I have finished building entire month's worth of favorite images, I move all the 'day folder' photos into a folder called 'RAW 2010' (or whatever the year is). So, now I don't have to look at the 'day folders' anymore. I just have a nice neat tidy month's worth of favorite photos. I rarely need to go back into the 'raw photos'.
4) UPLOAD to SHARE site
I upload the month's photos to my share page on Shutterfly and then I'm done.
Side note: I started a share page on Shutterfly when my first daughter was born. Now, I'm stuck with it because ALL our monthly images are there (five year's worth). I love going back and looking at them. While Shutterfly's quality is OK, I prefer my own professional printer. But, Shutterfly is now my 3rd back-up for personal images, so I can't complain - they are storing my images for FREE! If you'd like to see my share page, please send me an email and I'll send you a link.
5) CREATE a YEAR Photobook
At year's end, it is so simple to create a photobook of the year. I have all my favorites from the year by month. I can create it using any photobook site like shutterfly or my publisher etc. (This year I get to try out my new professional software...whoop!)
It sounds way more complicated than it is.
I can't stress enough to start a system today and stick with it.
and because this is a photography blog...here's one from yesterday: my littlest one's just-up-from-nap look
2.20.2011
Before and After {Barbara LeGere Photography | Portrait Photographer}
With the new year, I decided you should be more in control of your images. Yeah for you! So, you get to select which three images you will receive in full size high-resolution jpgs - instead of me. You pick which three you would like to be able to enlarge, print and mount. You pick which three I pay attention to and edit (and remove stray hairs and snoogies from), instead of me. Nine times out of ten, I select the same images you would from a session, but every once in a while, I don't. So, now, you will select which three get the attention. I also feel that you should get to keep and use all the images from your session, so you still receive those in a smaller format to print for your personal use.
You can see more information about the new pricing here.
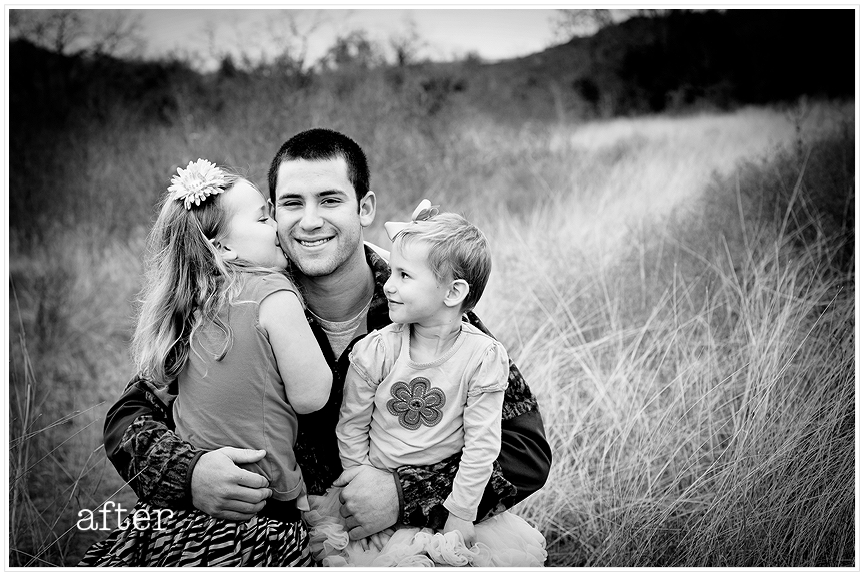
Some images need very little retouching. Maybe just highlights and shadows touched up a bit, or a bit of sharpening to the eyes. But some need a little more TLC or even an artistic treatment. To give you an idea of some of my prior work, here are a few 'before and afters':
Removal of stray hair and a touch of selective sharpening:
Warming and smoothing skin:
Improving contrast, sharpening the eyes and art texture treatment:
And, sometimes people walk in the background...can you believe it?
Selected sharpening, warming and removal of pole in the background:
Conversion to a rich black and white worked great for this image:
Thanks for checking out Barbara LeGere Photography. See you from behind the lens soon!
7.22.2010
Daddy Photo Tip
OK, let's face it, mama pregnant's face is round. Pregnancy, delivery, motherhood. The more of these components, the more prominent the double chin. I don't care how many miles you log on the pavement and how glowing you are, it's a benefit of carrying children.
So, Dad, we don't exactly want to remember the way we really looked on the most important day of our lives. Please try to help us look just a little bit better. Here's how.
Take the photo from above. That's it.
Chin up and viola, there goes the water weight! (well, sort of)
Here's an example of my husband's fantastic composition of both of our girls. These are obviously not "professional", but capture the moment and trust me, mama's face looked way more like a dimpled watermelon than these images lead you to believe.
OK, let's face it, mama pregnant's face is round. Pregnancy, delivery, motherhood. The more of these components, the more prominent the double chin. I don't care how many miles you log on the pavement and how glowing you are, it's a benefit of carrying children.
So, Dad, we don't exactly want to remember the way we really looked on the most important day of our lives. Please try to help us look just a little bit better. Here's how.
Take the photo from above. That's it.
Chin up and viola, there goes the water weight! (well, sort of)
Here's an example of my husband's fantastic composition of both of our girls. These are obviously not "professional", but capture the moment and trust me, mama's face looked way more like a dimpled watermelon than these images lead you to believe.
This photo tip can obviously be applied to anyone. Get a step stool out and start shooting the people you love from above, they may love you more.
Happy Shooting Daddies!
6.26.2010
Our Eyes vs. the Camera {Austin Child Photographer}
I love when clients and I can collaborate - I love it when they make suggestions. Typically, their ideas rock and mean something to them and we run with them. But, sometimes I find myself saying, well, actually, while your eye sees that clearly, the camera will not. So, I thought I'd take the time to try and explain myself. Well, I have a hard time understanding it myself, so my explanation is pretty basic.
When you are sitting by the pool watching your kids play this summer, take note. Your eyes see the bright blue sky, the bright green grass, the lucky grandparents "helping out" by sitting in the shade of the oak tree sipping lemonade and your kids are the bright pool splashing the annoyed young girl sunbathing in the kiddy pool (What does she expect, really?). The camera, however, cannot. All that bright light on the pool and the super dark shadow under the tree and the blue of the sky are extremely different to the camera.
Basically, your eye can see 20 degrees (or stops of light) and the camera: 4 (roughly).
I was out scouting Butler Park with Genny a number of months ago and snapped this:
I love when clients and I can collaborate - I love it when they make suggestions. Typically, their ideas rock and mean something to them and we run with them. But, sometimes I find myself saying, well, actually, while your eye sees that clearly, the camera will not. So, I thought I'd take the time to try and explain myself. Well, I have a hard time understanding it myself, so my explanation is pretty basic.
When you are sitting by the pool watching your kids play this summer, take note. Your eyes see the bright blue sky, the bright green grass, the lucky grandparents "helping out" by sitting in the shade of the oak tree sipping lemonade and your kids are the bright pool splashing the annoyed young girl sunbathing in the kiddy pool (What does she expect, really?). The camera, however, cannot. All that bright light on the pool and the super dark shadow under the tree and the blue of the sky are extremely different to the camera.
Basically, your eye can see 20 degrees (or stops of light) and the camera: 4 (roughly).
I was out scouting Butler Park with Genny a number of months ago and snapped this:
See, in the first one, you can see Genny and she's still even a little dark. If I had metered properly for her skin, the background would have been really white. And, of course, in the second image, there's our treasured Austin skyline, but no Genny. Maybe not the best example, but you get the idea. Your eyes see it all, but while technology is awesome, it's not nearly as awesome as the human body.
And, if you really care...yes, there are ways to augment and sort of create the world our eyes see with extra light. Trust me, this is fun with cityscapes that don't move a whole lot. This is not so much fun with toddlers.
Speaking of toddlers...here's my sweet baby taking the stairs like a big girl...
This is also part of the reason we do sessions in the early mornings and late evenings. This is Jossie in the evening a couple days later. No, I did not bribe her with that cheeseburger in her hand.
Labels:
photo tip
Subscribe to:
Posts (Atom)